Install a WordPress Plugin is the first step after installing a theme. This is an ultimate picture guide tutorial for WordPress beginners, to get started. But before starting here is a question, what are WordPress plugins, and why we need them?
In simple words, the answer is that plugins are a piece of code that enhances the performance of WordPress or other plugins. They can add features just like advanced forms, slideshows, analytics, etc.
there are numerous free and paid WordPress plugins are available on the Internet. But the installation steps are the same for all. Here in this tutorial, we will show you how to install a WordPress Plugin.
IMPORTANT NOTE!
if you are using WordPress.com then you can’t install a plugin. Plugin installation is only available for WordPress.org
There are two ways to install a Plugin
Before going further: Check out our developers handpicked best WordPress Plugins
1. Install a Plugin using Built in WordPress Plugin Search
The easy process of installing a WordPress plugin is to use the WordPress Builtin plugin search facility. The only drawback of this option is that it will search the free WordPress plugin repository only, paid plugins cannot be installed through this option.
Step 1:
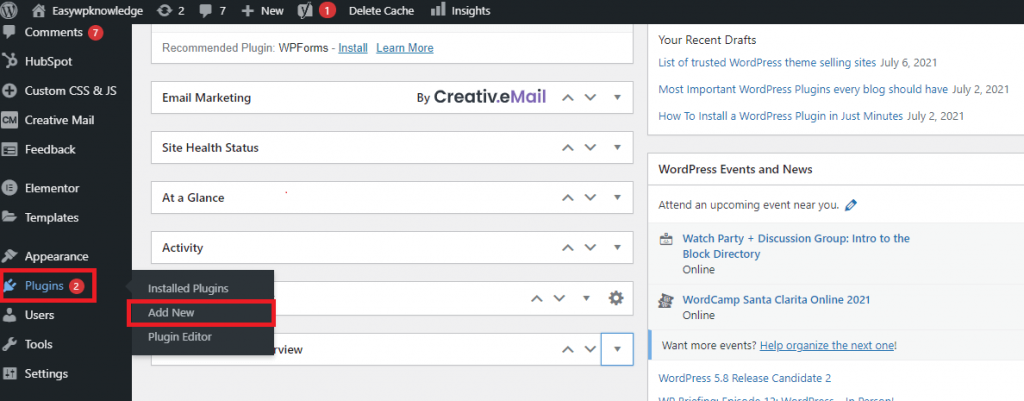
Login to your WordPress dashboard and, in the left side menu you will find the plugins option. Hover over this and a sub-menu will open. Here you will see three options
- Installed Plugins
- Add New
- Plugin Editor
Click on the add new button and it will take you to the plugin search window.

Step 2:
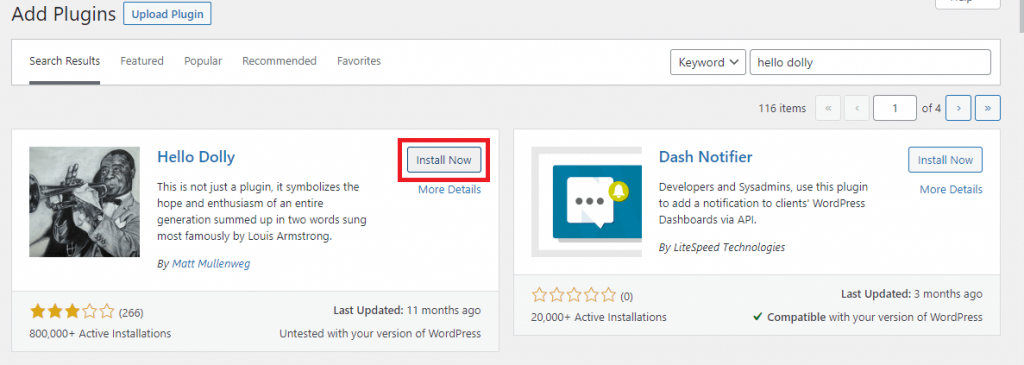
You will see a plugin search window just like the below screenshot. start typing the name of the plugin in the search box and WordPress will show you the results. If you are looking for certain functionalities you can filter your search by clicking on the Popular or Recommended tab.

Step 3:
After you find your desired plugin you will see a “Install Now” button. Here for this tutorial, we are installing the famous Holly Dolly plugin. Click on the install now button and it will start Installing the selected plugin.

Step 4:
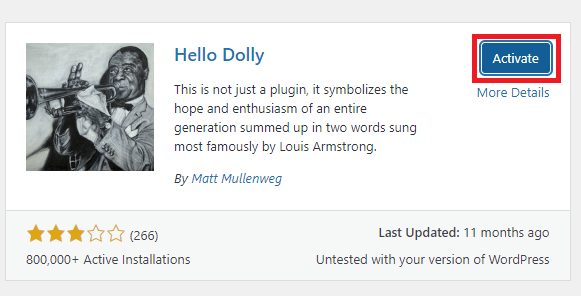
After installation has finished, the Install Now Button will be transform to “Activate”. Click on Activate button to activate the plugin as seen in screenshot. Plugin will be activated and added to the installed plugins.

Important: There are many site where paid plugins are available for free in a nulled or pirated form. We strongly recomend not to use them at all.
2. Install a Plugin By uploading ZIP file
Step 1:
Download the zip of the plugin that you want to install. You can find zip file on paid plugin websites or directly buy from plugin publishers.
After you have your zip file ready go to your dashboard and in Plugins menu click “Add New“. This time inseated of searching you will see a “Upload Plugin” button at top left corner of the page. Click that buutton.

After clicking the upload plugin button a new selection menu will open in a dropdown mode.
Step 2:
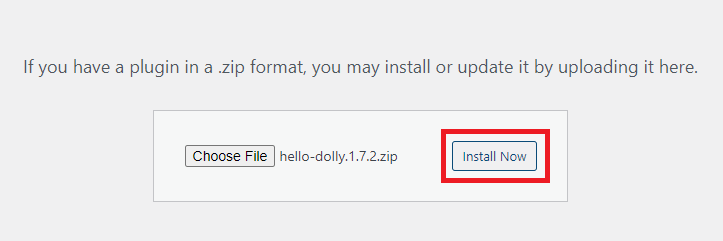
Click on the choose file button and navigate to the zip file in your computer that you downloaded.

Step 3:
After the file has been selected ‘Install Now’ button will be activated. Click on install now button and wordpress will start upload and installing your plugin.

Step 4:
You will see the step by step process of wordpress unpacking the package and installing your plugin. after all steps finish you will see a message ‘Plugin installed successfully’ and a blue color button of Activate Plugin. Click on Activate Plugin button and your plugin will be activated.

3. Bonus
Long story short, you can choose any of the above methods or just drop us a message at [email protected] and our expert WordPress will upload your new plugin for Free.

Pingback: How to redirect HTTP to HTTPS Using .htaccess - Easywpknowledge