Plugins

7 Best WordPress Plugins to Create attractive Content for your blog

7 Best WordPress Plugins to Create attractive Content for your blog

Present, 43 of the total websites are powered by WordPress. It’s the stylish content operation system that anyone can fluently handle the website content. It has further than plugins that can be installed on your WordPress website.

It becomes hard for you to choose the stylish WordPress plugin to produce quality content for your point. That’s why then we’ve listed the stylish WordPress plugins to produce attractive content in 2022. If you want to produce SEO- optimized content that ranks well on the Google hunt machine also you need the stylish SEO plugin.

Rank Math is the stylish SEO plugin that handles numerous effects to make your website SEO friendly. This plugin helps you a lot to rank well on all hunt machines.

If you want to produce SEO- optimized content that ranks well on Google hunt machine also you need the stylish SEO plugin. Rank Math is the stylish SEO plugin that handles numerous effects to make your website SEO friendly. This plugin helps you a lot to rank well on all hunt machines.

Features of Rank Math:
  • Built-in Robots.txt
  • 404 Monitoring
  • Redirection
  • Content AI
  • FAQ and How-to Blocks
  • Instant Indexing
  • Google News Sitemap
  • Video Sitemap
grammerly

Grammarly is one of the stylish WordPress plugins to produce killer content that will help you in writing grammatical- error-free content and detects wrong spelling and punctuation miscalculations. You need to just install the Grammarly extension for the cybersurfer and it’ll start working on your website, Google Docs lines and far and wide you can write online.

Features of Grammarly:

  • Real-time Writing Feedback
  • Checks Grammar and Punctuation Error
  • Checks Plagiarism
  • Tone Detector
semrush

To increase the rank of your website on hunt machines, you have to do a proper SEO of your website. Semrush isn’t a WordPress plugin but it’s the stylish SEO tool that can help you in assaying your website in every way.


Semrush is available in free and ultraexpensive performances. In the free interpretation, you’ll have veritably limited access to the features. You can also get a 14 days free trial from then.

Features of Semrush:
  • Content Marketing
  • Local SEO
  • Rank Tracking
  • Social Media Management
  • Link Analysis
  • Content Optimization
  • Content Marketing Analytics
  • Paid Advertising
  • PPC Keyword Research
wpforums

 If you need a form in your content to get leads also WP Forms is the stylish drag and drop contact form builder. You can fluently produce a stoner-friendly contact form in no time. It’s available in free and paid performances.

Features of WP Forms:

  • Responsive Form Builder
  • Smart Conditional Logic
  • Instant Notifications
  • Multi-Page Forms
  • User Registration
  • Geolocation Data
yoast

 Yoast is another stylish and most popular WordPress plugin to optimize content effectively. It’ll help you in targeting the keyword in a proper way and perfecting the readability of the content. If your content is well written and SEO optimized also the “ SEO ” and “ Readability ” features shows the green signal. If it shows the red signal also you need to ameliorate the SEO and readability of the content.

Features of Yoast:
  • Readability Analysis
  • Internal Linking Blocks
  • FAQ and How-to Blocks
  • Structured Data
  • Elementor Integration
tableofcontecnts

 Table of content plus is a free WordPress plugin that automatically creates an indicator for each runner and post. A stoner can fluently navigate the content and suitable to find what he’s looking for, using this indicator of the composition. The indicator of the composition is shown above the first title of the composition. It can also be placed on the sidebar of the website

Features of TOC Plus:
  • TOC on Sidebar
  • Automatically Creates a Sitemap for Pages and Categories
  • Number List Items
  • Smooth Scroll Effect
wegolet

 If you want a multilingual website also Weglot Translate is the stylish WordPress plugin for you. With this plugin, you can convert your website into multilingual within twinkles without doing any coding. The most important thing about this plugin is that it’s SEO friendly WordPress plugin.

Features of Weglot Translate:
  • Manage and Edit all Translations
  • Multilingual Language Switcher
  • SEO Optimized
  • Translate Directly from Page
activate plugin screen

How To Install a WordPress Plugin step by step guide

Install a WordPress Plugin is the first step after installing a theme. This is an ultimate picture guide tutorial for WordPress beginners, to get started. But before starting here is a question, what are WordPress plugins, and why we need them?

In simple words, the answer is that plugins are a piece of code that enhances the performance of WordPress or other plugins. They can add features just like advanced forms, slideshows, analytics, etc.

there are numerous free and paid WordPress plugins are available on the Internet. But the installation steps are the same for all. Here in this tutorial, we will show you how to install a WordPress Plugin.

IMPORTANT NOTE!

if you are using WordPress.com then you can’t install a plugin. Plugin installation is only available for WordPress.org

There are two ways to install a Plugin

Before going further: Check out our developers handpicked best WordPress Plugins

1. Install a Plugin using Built in WordPress Plugin Search

The easy process of installing a WordPress plugin is to use the WordPress Builtin plugin search facility. The only drawback of this option is that it will search the free WordPress plugin repository only, paid plugins cannot be installed through this option.

Step 1:

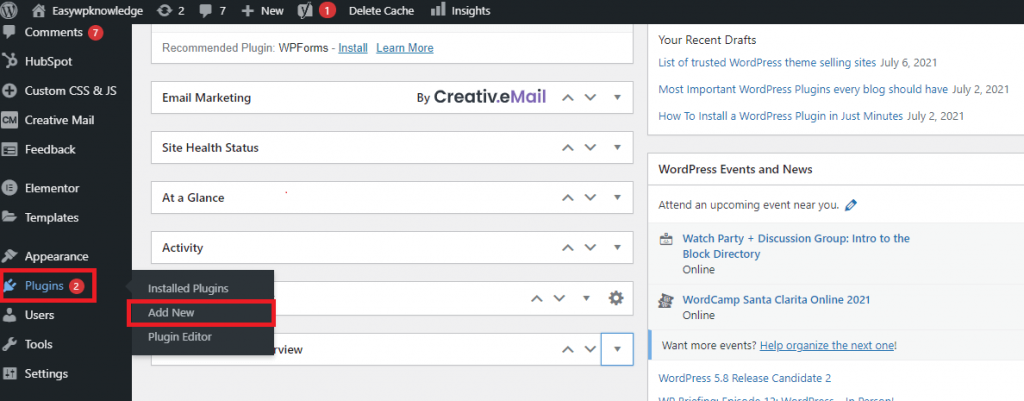
Login to your WordPress dashboard and, in the left side menu you will find the plugins option. Hover over this and a sub-menu will open. Here you will see three options

  • Installed Plugins
  • Add New
  • Plugin Editor

Click on the add new button and it will take you to the plugin search window.
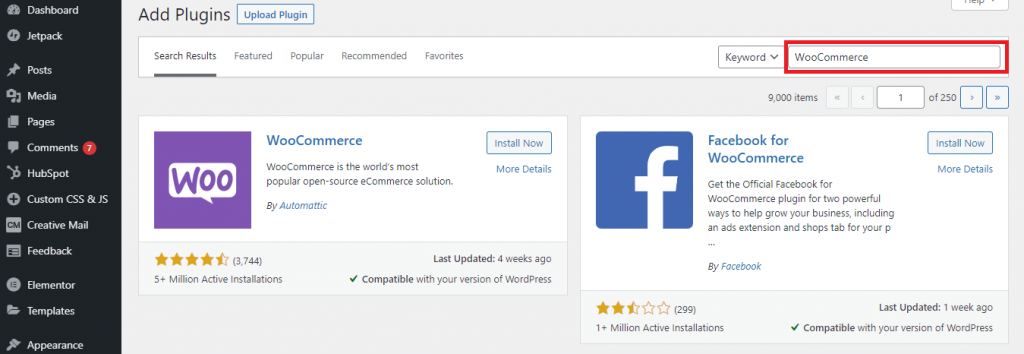
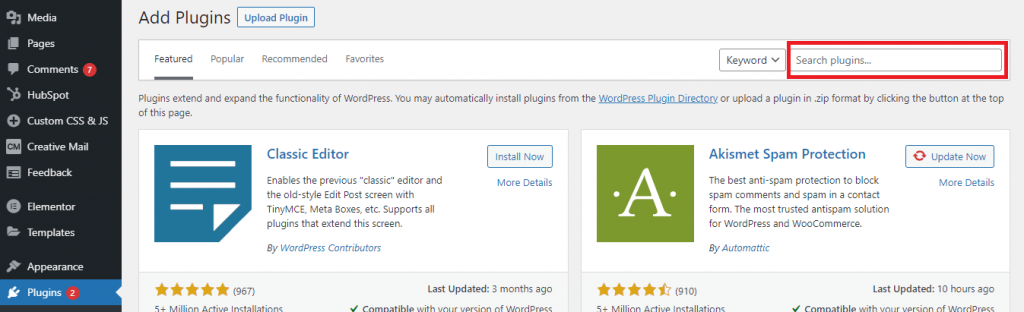
Step 2:

You will see a plugin search window just like the below screenshot. start typing the name of the plugin in the search box and WordPress will show you the results. If you are looking for certain functionalities you can filter your search by clicking on the Popular or Recommended tab.
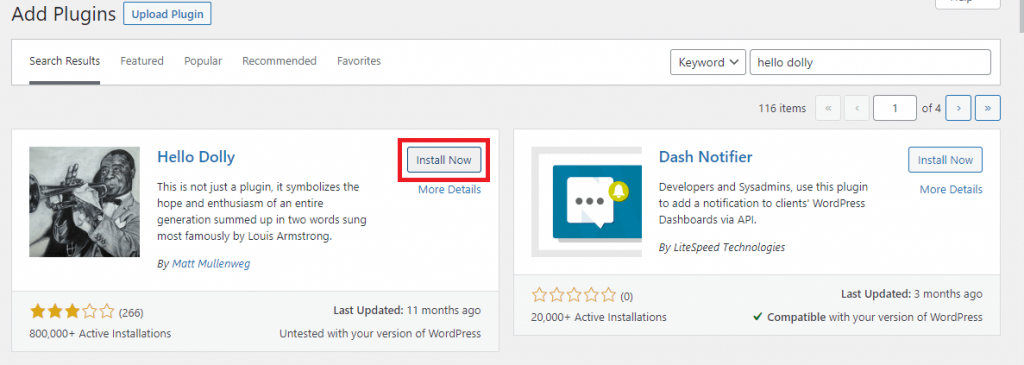
Step 3:

After you find your desired plugin you will see a “Install Now” button. Here for this tutorial, we are installing the famous Holly Dolly plugin. Click on the install now button and it will start Installing the selected plugin.
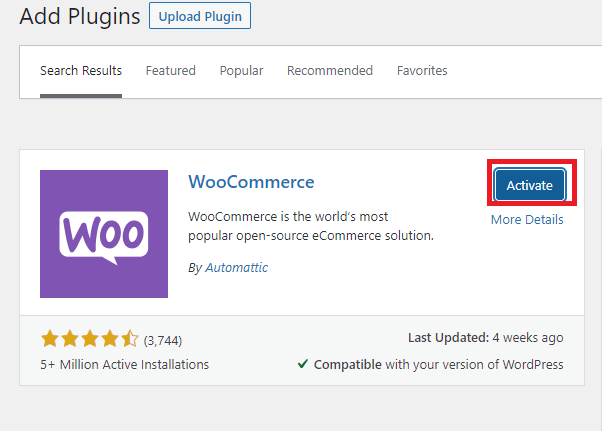
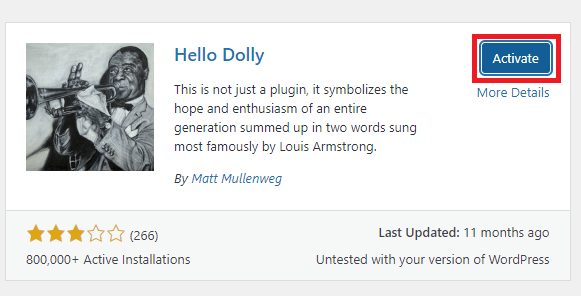
Step 4:

After installation has finished, the Install Now Button will be transform to “Activate”. Click on Activate button to activate the plugin as seen in screenshot. Plugin will be activated and added to the installed plugins.

Important: There are many site where paid plugins are available for free in a nulled or pirated form. We strongly recomend not to use them at all.

2. Install a Plugin By uploading ZIP file

Step 1:

Download the zip of the plugin that you want to install. You can find zip file on paid plugin websites or directly buy from plugin publishers.

After you have your zip file ready go to your dashboard and in Plugins menu click “Add New“. This time inseated of searching you will see a “Upload Plugin” button at top left corner of the page. Click that buutton.

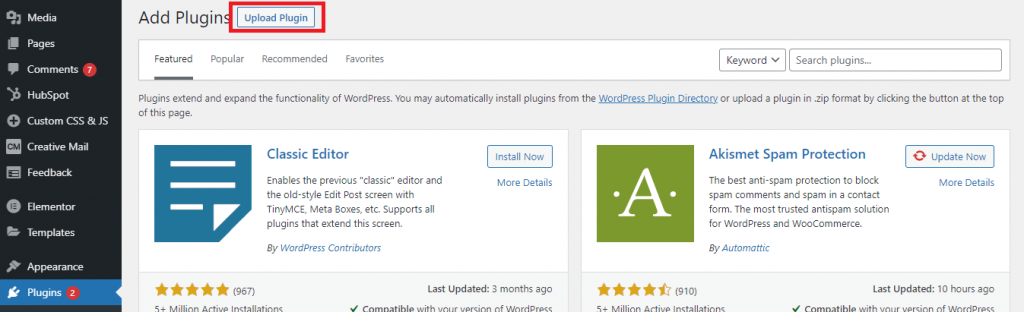
After clicking the upload plugin button a new selection menu will open in a dropdown mode.

Step 2:

Click on the choose file button and navigate to the zip file in your computer that you downloaded.
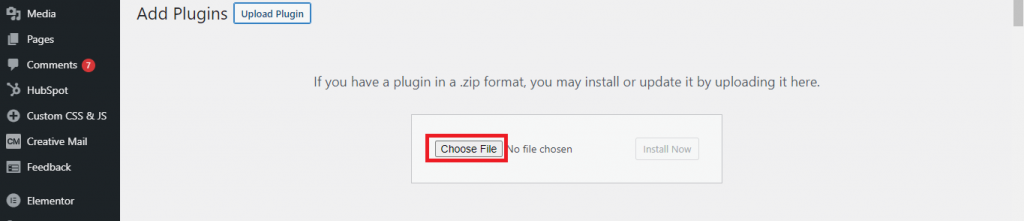
Step 3:

After the file has been selected ‘Install Now’ button will be activated. Click on install now button and wordpress will start upload and installing your plugin.
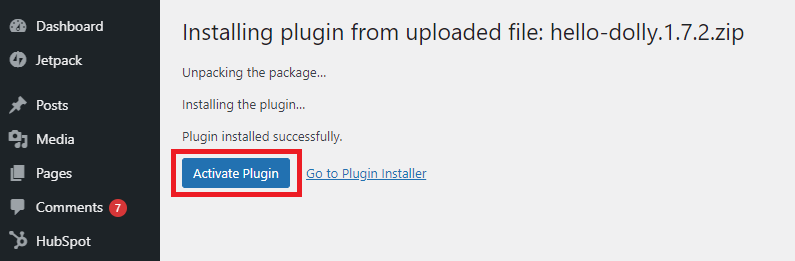
Step 4:

You will see the step by step process of wordpress unpacking the package and installing your plugin. after all steps finish you will see a message ‘Plugin installed successfully’ and a blue color button of Activate Plugin. Click on Activate Plugin button and your plugin will be activated.

3. Bonus

Long story short, you can choose any of the above methods or just drop us a message at [email protected] and our expert WordPress will upload your new plugin for Free.

woocommerce logo

How to install WooCommerce plugin in WordPress

In this blog, we will show you the complete process of how to install the WooCommerce plugin, creating a store with the WooCommerce plugin, and configure your settings, so you can begin adding products.

WooCommerce is now the most popular plugin on WordPress for creating a store because of its great flexibility and variety of supported plugins available to customize your store.

Another great reason for choosing the WooCommerce plugin is that it’s easy to install and manage, even a non-technical person can manage a store on its own. It’s very easy to add or edit a product in WooCommerce and manage orders.

here we will show you the step-by-step guide on how to install and configure WooCommerce. So let’s get started.

1. install WooCommerce

For Installing WooCommerce go to your WordPress dashboard and in the plugin, menu Click on Add New. This will take you to the plugin search window. In the search bar enter “WooCommerce” and hit enter. From the search results Choose WooCommerce and click on Install Now button.

2. Setting up WooCommerce

Once the installation is finished the next step is to set up the WooCommerce. The easy startup wizard will help you in installation. In the first step enter the following details of your store

  • Store Address
  • Country
  • city
  • Post code

3. Enter store details

In the next step enter the basic details of your store. Select the store industry, either its fashion, medical or an Electronic, etc.

4. Select product types

In this step select the product types. You can select from these options.

  • Phusical Products
  • Downloads
  • Subscriptions
  • Memberships
  • Bookings
  • Customizeable products

install WooCommerce

The first two are included in the free version of WooCommerce, for the rest you have to buy the Premium version of the WooCommerce plugin

5. Business details

n this second last step you have to enter the information about your store. This information includes the details like how many products your store will have and currently you are selling anywhere?

6. Choosing the theme

In this last step, you have to choose the WordPress theme that should support the WooCommerce plugin. You can search Google for “WooCommerce supported WordPress themes“. You will find many paid and unpaid themes that will support WooCommerce. Here WooCommercegives you the option to continue with your default theme, if your current theme support then you can select ‘Continue with my active theme‘ or you can select Storefront which is a famous WooCommerce theme. As our active theme, Astra supports WooCommerce so I continue with the first option.

This website’s active theme, Astra supports WooCommerce so continue with the first option.

7. WooCommerce recommended plugins

Here WooCommerce will show you the list of some important plugins that will help you in your store marketing. These are the recommended ones, you can select them or skip them for now and install them later.

8. Finish install WooCommerce & Customize your store

After performing all the above steps, now it’s time to add products and set up your store details. First of all, you need to set up the payments and tax information for your store. We recommended adding multiple payments options for ease of your customers.

How to Use SMTP Server to Send WordPress Emails

The draw backs of WordPress mail() function

WordPress uses mail() function in PHP to send emails. Many hosting providers does not configure have this function properly, or to avoid abuse they have disabled it entirely. In either case, this causes your WordPress emails function to not function as expected .

Third party email service is the alternative solution is to send out your emails from wordpress. You can use services like Mailgun, Google Apps for work, or Sendgrid or sendinblue and many more…

You may have free services for limited number of emails, which is perfect for small blog, website or store. If you want high services you will have to pay for your account, and the cost will depend on how many emails you send. in this tutorial we show you how to fix WordPress not sending email issue completely.

What if told you that there is another option, and likely you are already paying for it? seems good!

2. Using Email Accounts given by Your Hosting provider

Most WordPress hosting providers offer email services free for each domain you host on their hosting servers. This means you can create email accounts with your own domains name like [email protected]

First of all you will need to create an email account. You can do this easily in your cPanel by following steps. Your hosting service provider visual may differ from following account management system, but the basic is the same on most hosting services.

Log into your site hosting cPanel account, and click on Email Accounts under the mail section.

cPanel Dashboard

This will show you a form where you need to fill out required information to create your email account(s)/.

Since this will be your official email for WordPress site, we advise that you create an email account like [email protected].

Make sure to replace yourblogaddress with your own domain name.

cPanel email account creation

After successfully creating your email account, you are now ready to use it in WordPress. But before continuing you do that, you will need the blow information from your hosting service provider.

  1. SMTP Hosting address
  2.  
  3. SMTP Port number for secure login.

You can check the support section on your host’s website, cPanel managing, for this information. If you are unable just comment blow so we help you find it or you should contact the hosting support to request this information.

cPanel SMTP Info

Install the Easy WP SMTP Plugin to your WordPress

You will now need to install and activate the Easy WP SMTP plugin. For more details, see our following step by step guide on how to install WordPress plugin.

Easy WP SMTP Plugin install
Upon activation, you need to visit Settings » Easy WP SMTP to configure the plugin settings.
Easy WP SMTP Plugin settings

Here you should provide the information that you get from your cPanel email account manager as provided above in picture.

Testing Your Easy WP SMTP

Now that you have set up Easy WP SMTP to send emails, let’s test if our plugin  and check if its working fine. On the plugin’s settings page, click on the ‘Test Email ’ tab. As seen blow

Easy WP SMTP Plugin test email
You need to provide your active email address where you would like to receive test email. This could be any Gmail oy Yahoo or any other valid email address that you can access right now. After that click on the “Send Test Email” button to continue process. Easy WP SMTP will now send an email message using the new SMTP settings you entered. You will see a success message when email is sent successfully.
You did it!
wordpress email issue

Fix the WordPress Not Sending Emails Issue using Plugin

Fix the WordPress email problem right now because it is very common among blogs and store built on WordPress. WordPress email by default use mail() function to send emails.

Many managed WordPress hosting providers don’t provide email hosting service. However, that doesn’t mean you can’t send emails from your WordPress blog/store. Email sending means your WordPress site will be able to send notifications, WooCommerce order confirmations, and other types of site-related, login/signup, emails.


Typical Problem occurs

Typically when you are trying to fix the WordPress not sending emails issue most probably email is set up incorrectly on the WordPress installation, it is not a problem on the server or there can be an incompatibility.

In this blog, we’ll show you how to identify the problem why WordPress isn’t sending emails to you or other users, and show you how to fix it this problem. Whether you’re running a regular WordPress site or a WooCommerce store, we’ll show you how to send emails and keep site running again.

1. Emails Are Sending but Going to Spam

Before Fix the WordPress email issue or running any tests, make sure emails from WordPress are not going to spam folder.

If a users report to you that they are not receiving WordPress emails, it might be simply that their emails are going to spam folder.

Ask users to check their spam folder for emails from the website. Some email clients might identify WordPress emails as spam because they’re automated response.

2. Your Server Isn’t Configured Correctly

A common reason for Site not sending emails is that your server is not configured to send emails.

Web servers aren’t designed for sending emails and it might be that your server isn’t configured to use the PHP mail() function.

But you can easily check if this is what’s causing the problem – and you can fix it

3. Fix the WordPress email before that Test Whether the Server Is Sending Emails

The first thing you can do is to run a test on your WordPress site with the free Check Email plugin By WPChill.

In need of a tool that allows you to easily log and view all emails sent from WordPress? Check & Log might be just the solution for that. This WordPress plugin helps you store sent emails for auditing purposes, as well as debug email related problems in your WordPress site. Works best on eCommerce websites that have been created with WooCommerce or Easy Digital Downloads.

Check & Log Email Setup

This is a plugin designed to test if your WordPress installation and/or server is configured to send emails.

Once installed, go to Check & Log emails > Check Email in your WordPress dashboard sidebar. Enter your email address to send a test email, and click on Send test email.

You will see a confirmation message as under.

check email

Check your email inbox and other folders to see if you received the test email that plugin send as test. The subject line will appear as “Test email from https://yourblogaddress.com.”

Check test email

4. Fix the WordPress email by using SMTP

If you are unable to fix the issue then you can use SMTP option, which is very common to fix the WordPress emails problem.

How to Add a Retweet Button on Your Blog Post

Twitter has seen exponential growth in the past few years which is the main reason why more and more writers are now sharing their stories on twitter handle. If you have seen one of the coolest Retweet buttons on some of most famous blogs, they can be on your blog also.

In this article, we will show you how to add a Retweet Button in all of your posts/pages, so your audience can Tweet your stories with just one click.

There are two main ways to add retweet button in your site. First is through the WordPress Plugin called Tweetmeme

Upload the plugin into example.com/wp-content/plugins/

Visit plugin page from dashboard and find “tweetmeme”

Activate it, and then visit the plugins settings page.

You can change the RT @tweetmeme which is default to RT @yourusername. In our case it would be RT @yourtwittername.

This plugin also allows you to choose the location of the button placement. bottom left Corner, Top right Corner, and so on.

The second way is to do it manually by placing the following codes in your templates file at the location where you want.

For the Large Button:

<script type="text/javascript">
tweetmeme_source = 'Easywpknowledge';
</script>
<script type="text/javascript" src="http://tweetmeme.com/i/scripts/button.js"> </script>

For the Compact Button:

<script type='text/javascript'>
tweetmeme_style = "compact";
tweetmeme_source = 'Easywpknowledge';
</script>

Now you have a Retweet button on your blog. You are now able to get more exposure. Follow Easywpknowledge on Twitter.