If you’ve never used a fire extinguisher before, here’s what you need to know. Make sure you’re at least eight feet from the fire before you start using the extinguisher. Unlock the operating lever by pulling back a pin and pointing the nozzle at the base of the flames. You’ll need to sweep from side to put the fire out.
After squeezing the handle, aim the extinguisher at the fire and then squeeze the handle of the extinguisher. This will release the extinguishing agent. Squeeze the handle to release the extinguishing agent and sweep it from side to side. Once you’ve finished, repeat these steps. If a fire re-ignites, keep sweeping from the side to the base of the fire until the fire is completely out.
Once the fire is out, you should evacuate the area and pull out a fire alarm if you can. If the extinguisher is empty, back away and follow the P.A.S.S. technique to make sure the fire is out. If the fire has spread and you cannot get to it safely, call the fire department or a reputable safety organization to get help.
Before you begin to use a fire extinguisher, determine where you can safely exit the area. Before you reach the fire, close doors and windows, and activate the fire alarm. Then, begin applying the extinguisher until the flames have been put out. You may need to monitor the area for re-ignition. Once you have squeezing the handle, the unit will begin to work.
If you’ve been thinking about adding your resume to online job sites, the first step is determining which format is the best for the job posting you’re looking to apply for. Some websites will require you to copy and paste your resume into their form, while others will ask you to upload your document. Either way, you’ll need to be careful to upload your resume in a format that is readable by the hiring manager.
Different websites will require different formats, but they will all require a PDF version. If the site doesn’t allow you to use a resume builder, you can copy your resume and paste it into a text box. It’s best to save a local copy to your computer rather than submitting it as an attachment. This will ensure that your resume is consistently formatted and will stand out in the database.
Depending on the site, you may need to search for a specific resume file to upload. You may find that you don’t have one. In that case, you’ll need to search for the file of your resume and then choose a format. If the format is not consistent or you have to add space between sentences, you’ll need to change your strategy. You’ll need to choose a new format, or use a different font.
If you’re looking to buy new clothes but have a small budget, then the tips listed below will help you find the best deals. By keeping your budget in mind, you’ll be able to afford the items you really want. It may be difficult to buy trendy items that will be out of style in a couple years, so it’s helpful to have a list of what you need and want.
Know your current wardrobe. Knowing your current clothes will make it easier to pair pieces together and avoid the temptation of buying something you don’t really need. Regardless of your budget, you can find bargains at end of the seasons. For example, at the end of winter, you can stock up on winter clothes and get good deals. You’ll also be ahead of the game when it comes to online shopping, so make sure you’re a few months ahead of time.
Before you shop, decide what kind of clothes you need. For example, if you’re buying clothing for a special occasion, it would be a good idea to buy something inexpensive. If you’re trying to lose weight, you might find it demotivating to stare at a huge rack of clothing, especially if you’re not sure what size you’ll be in a few months. It’s also a good idea to buy clothes that you’ll be able to wear today instead of waiting until you reach your goal size.
What are organic products? An organic product is any food that has been grown or produced using organic methods. These methods promote biodiversity and ecological balance, and many countries have different standards for what constitutes an organic product. These farms use practices that cycle resources, protect wildlife, and conserve resources. While the standards differ around the world, the key factor in determining whether a product is organic is the provenance. Some companies use certification programs to ensure that their products meet these standards, while others use government certification programs to ensure the quality of the product.
Although organic products are not necessarily more expensive than conventionally raised meat, they are more nutritious and free of antibiotics and hormones. While many people do not prefer the smell of farm animals, it is better to choose chicken breasts that are 100% grass-fed. Many cities have a farmers’ market where local organic farmers sell their produce at a discount to grocery stores. By buying organic chicken thighs, you can save money on the cost of conventionally raised chicken breasts, and enjoy the delicious taste of meat that is completely free of antibiotics and hormones.
There are many benefits to organic foods. For example, those with allergies to chemicals and pesticides may find their symptoms diminishing. Furthermore, since they contain fewer artificial additives, these products tend to be more nutritious. However, the price of organic food isn’t always the best value for your money. Most baked goods that claim to be “organic” still contain a high amount of fat, sugar, and calories. So, you’re not getting a better deal when buying an organic product.
The biggest difference between organic and non-organic foods is the presence of artificial ingredients. The most common of these include preservatives, growth hormones, and pesticides. The main difference between organic and non-organic foods involves the lack of artificial additives. And while they may have more flavor, they are still full of artificial ingredients. That’s why some people feel that eating organically will reduce their risk of developing a health condition in the future.
In addition to pesticides, organic foods should be grown without the use of synthetic fertilizers. This way, they can be more nutritious. In addition, some of them may not be organic, but they are still worth considering. You should also look for labels that state the ingredients used in organic products. These are typically a little more expensive than conventionally-grown foods, but they’re worth the extra cost. There are many benefits to organic products.
One such brand is Annie’s. The campaign, titled “Organic for Everybunny,” was launched this summer on Facebook and will run through the fall. It aims to create a positive image for organic foods and reduce the negative connotations associated with these products. It is also important to note that a consumer can’t always tell if a product is safe for them or not. They can’t tell if it’s safe for them to eat.
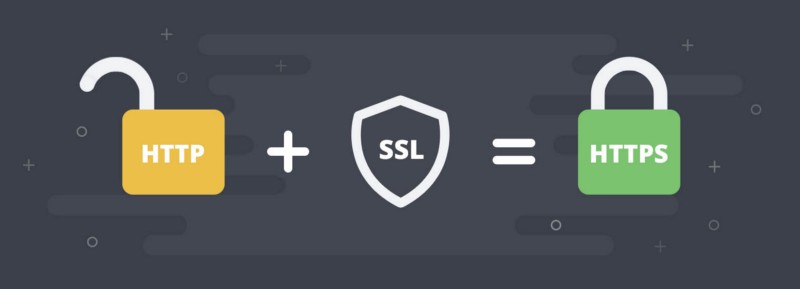
Chrome and Firefox have been showing insecure website warnings on sites that do not have valid SSL certificates. Without valid SSL, the website will show insecurity to the visitors. Therefore, using a valid SSL-encrypted connection for safety is necessary. that is why It becomes very important to redirect your site from HTTP to HTTPS.
[sc name=”readalso”]
What is SSL?
SSL (Secure Sockets Layer) is a standard security protocol for establishing encrypted links between a web server and a browser in online communication.
The usage of SSL technology ensures that all data transmitted between the web server and browser remains encrypted.
An SSL certificate is necessary to create an SSL connection. You would need to give all details about the identity of your website and your company as and when you choose to activate SSL on your web server. Following this, two cryptographic keys are created — a Private Key and a Public Key.
To force your web traffic to use HTTPS, there are two ways: to edit the codes in the .htaccess file.
Before we move on redirecting HTTP to HTTPS, here’s how you can edit the .htaccess file. you can skip to the Redirection steps if already know about it.
Character illustration of people holding world wide web icons
Editing .htaccess File
There are instructions in the .htaccess file that tell the server how to act in certain scenarios which directly affects how your website will functions. Common directives in .htaccess file:
Redirects
Rewriting URLs
Ways to edit a .htaccess file:
Edit the file on your computer and upload it to the server using FTP.
Use “Edit” mode in FTP program that allows you to edit a file remotely.
Use a text editor and SSH to edit the file.
Use the File Manager in cPanel to edit the file.
Bonus:
Do you know in WordPress you can do this using a plugin, Here is a guide for you on how to install a WordPress plugin?
Replace “yourdomain” with your actual domain name(eg: easywpknowledge.com), wherever required. Also, in the case of the folder, replace it with the actual folder name.
Are you facing a ‘fatal error: Maximum execution time of 120 seconds exceeded’ on your WordPress website when trying to update a WordPress plugin or theme?
Normally, this problem happens when a PHP code in your WordPress website/blog takes a long time to run. reaches the time limit set by your hosting provider. To prevent the abuse of server resources time limit is very important.
This article will show you how to fix the fatal error: maximum execution time exceeded in WordPress.
Why ‘Maximum Execution Time Exceeded’ Error Occurs?
WordPress core is coded in the PHP programming language. To protect web servers from being abuse, there is a time restriction set for a script to how long time it will run.
The actual time restriction different for different hosting companies. However, usually, the time for the maximum execution is set between 30 – 120 seconds because that’s enough for a good script to run.
When a script reaches the maximum execution time limit, an error is thrown by the servers that the maximum execution time is exceeded.
Although Maximum Execution Time Exceeded error is shown as a ‘fatal error,’. It is the most common WordPress error that many developers face. But you can easily resolve this by changing the time limit.
Caution: We strongly recommend not to change this setting permanently. change it for a script, when it runs successfully revert back it to your hosting server’s original limit.
If this error is caused by a plugin, simply go to your installed plugins menu. There you can simply deactivate or delete the plugin that is causing the error.
However, if the plugin is important and you don’t want to deactivate It, then you can fix this cause that triggered the error.
You will need to manually edit your .htaccess file to fix this issue by adding a line of code in the .htaccess file.
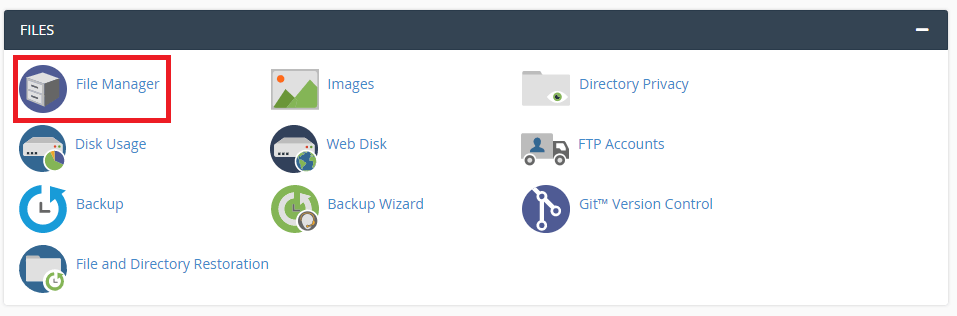
Simply go to your website cPanel and look for the file manager there.
Your .htaccess file is located in the main directory of your site. Simply go to file manager and look for the “Public_html” directory. Navigate to it and you will find a file with the name .htaccess.
Right-click on the .htaccess file and choose edit. the file will be opened in a text editor. Simply add the following line of code to the end of the file.
php_value max_execution_time 300
This will increase the execution time to 6 minutes. Now refresh site and see if the error is resolved or not. If still this error happens. try to increase it more and more.
Second Method
The second method is to change your php.ini file.
The php.ini file is the configuration file that defines settings for your PHP on the server. Many hosting platforms, you may not be able to find it inside your website directory.
If you can not file that file simply create a new one. Go to the root directory of your website. Here create a new file with the name of php.ini and add the following line of code and save it.
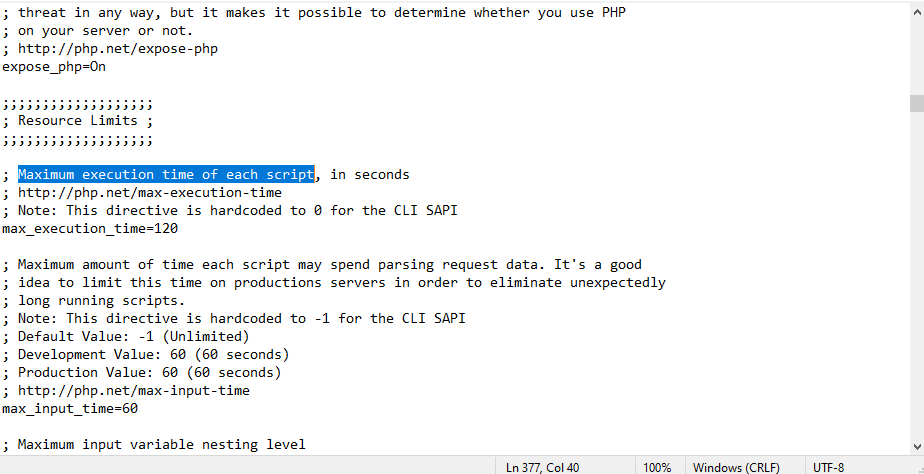
max_execution_time = 60
If you are running on localhost and using XAMPP, then you can navigate to your xampp installation directory, usually in your C:/Xammp folder. Now locate the PHP folder and find the php.ini file. Right-click on it and select edit.
php.ini will be opened in the default text editor. Search for the ‘Maximum Execution Time’ and change the Execution time there, as shown in the below image.
Now save this file and check the site, hopefully, the error will be resolved. If not then simply comment below so we can help you.
Install a WordPress Plugin is the first step after installing a theme. This is an ultimate picture guide tutorial for WordPress beginners, to get started. But before starting here is a question, what are WordPress plugins, and why we need them?
In simple words, the answer is that plugins are a piece of code that enhances the performance of WordPress or other plugins. They can add features just like advanced forms, slideshows, analytics, etc.
there are numerous free and paid WordPress plugins are available on the Internet. But the installation steps are the same for all. Here in this tutorial, we will show you how to install a WordPress Plugin.
IMPORTANT NOTE!
if you are using WordPress.com then you can’t install a plugin. Plugin installation is only available for WordPress.org
1. Install a Plugin using Built in WordPress Plugin Search
The easy process of installing a WordPress plugin is to use the WordPress Builtin plugin search facility. The only drawback of this option is that it will search the free WordPress plugin repository only, paid plugins cannot be installed through this option.
Step 1:
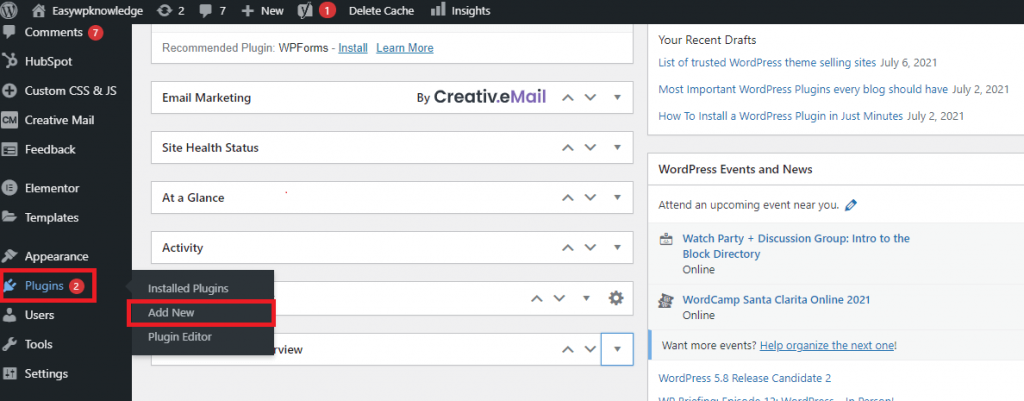
Login to your WordPress dashboard and, in the left side menu you will find the plugins option. Hover over this and a sub-menu will open. Here you will see three options
Installed Plugins
Add New
Plugin Editor
Click on the add new button and it will take you to the plugin search window.
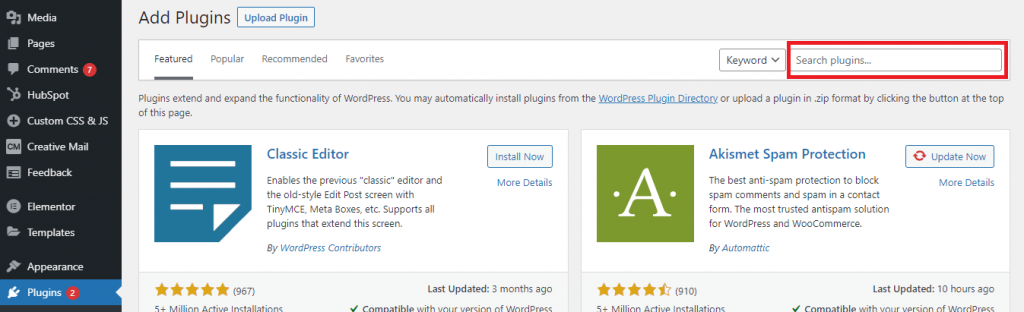
Step 2:
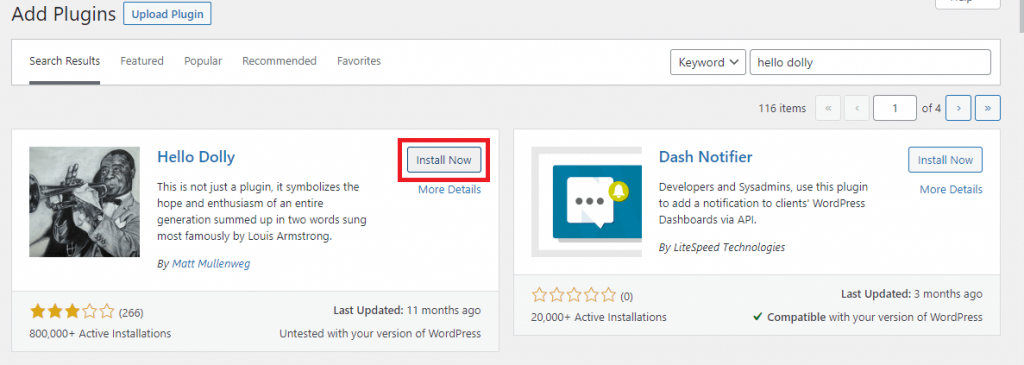
You will see a plugin search window just like the below screenshot. start typing the name of the plugin in the search box and WordPress will show you the results. If you are looking for certain functionalities you can filter your search by clicking on the Popular or Recommended tab.
Step 3:
After you find your desired plugin you will see a “Install Now” button. Here for this tutorial, we are installing the famous Holly Dolly plugin. Click on the install now button and it will start Installing the selected plugin.
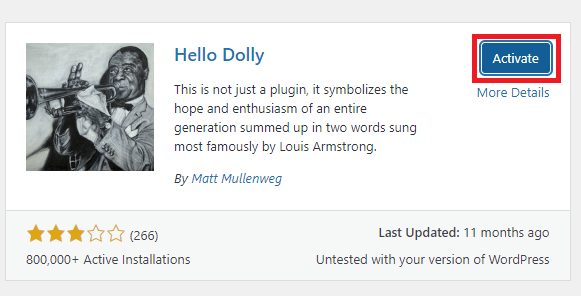
Step 4:
After installation has finished, the Install Now Button will be transform to “Activate”. Click on Activate button to activate the plugin as seen in screenshot. Plugin will be activated and added to the installed plugins.
Important: There are many site where paid plugins are available for free in a nulled or pirated form. We strongly recomend not to use them at all.
2. Install a Plugin By uploading ZIP file
Step 1:
Download the zip of the plugin that you want to install. You can find zip file on paid plugin websites or directly buy from plugin publishers.
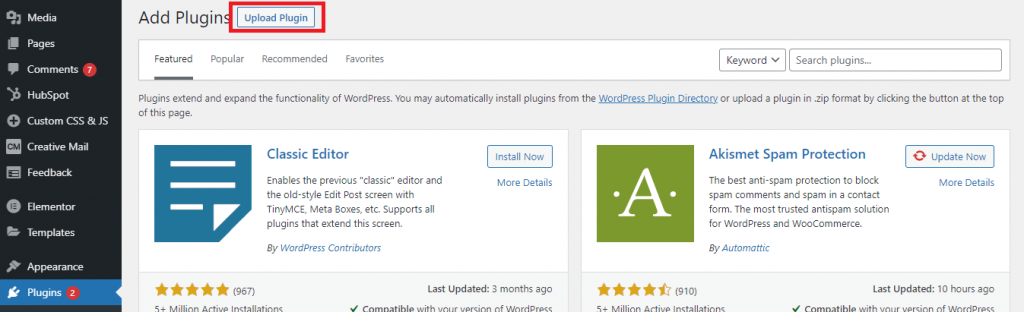
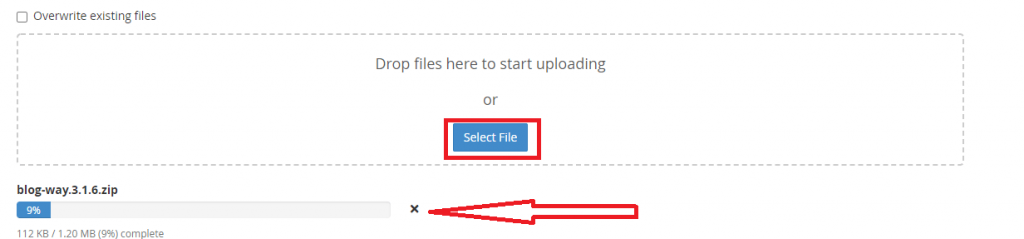
After you have your zip file ready go to your dashboard and in Plugins menu click “Add New“. This time inseated of searching you will see a “Upload Plugin” button at top left corner of the page. Click that buutton.
After clicking the upload plugin button a new selection menu will open in a dropdown mode.
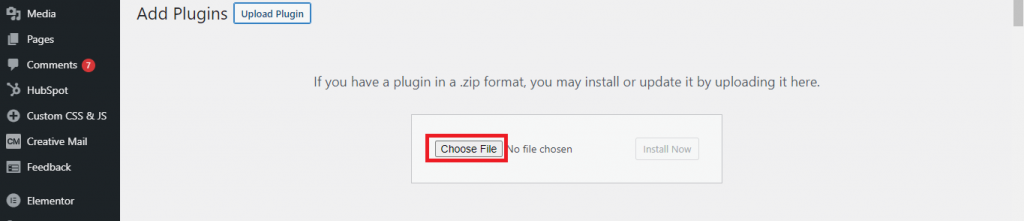
Step 2:
Click on the choose file button and navigate to the zip file in your computer that you downloaded.
Step 3:
After the file has been selected ‘Install Now’ button will be activated. Click on install now button and wordpress will start upload and installing your plugin.
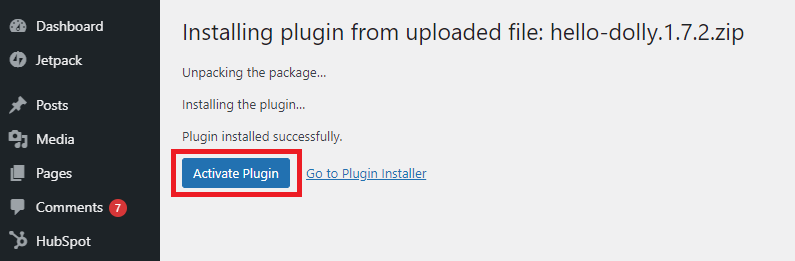
Step 4:
You will see the step by step process of wordpress unpacking the package and installing your plugin. after all steps finish you will see a message ‘Plugin installed successfully’ and a blue color button of Activate Plugin. Click on Activate Plugin button and your plugin will be activated.
3. Bonus
Long story short, you can choose any of the above methods or just drop us a message at admin@easywpknowledge.com and our expert WordPress will upload your new plugin for Free.
Are you looking for help to install a new WordPress theme, then you are in the right place. In this pictures guided tutorial for the latest version of WordPress we will show you how to install a WordPress theme. You have two options, follow this step-by-step guide or contact us for free theme installation by expert WordPress developers.
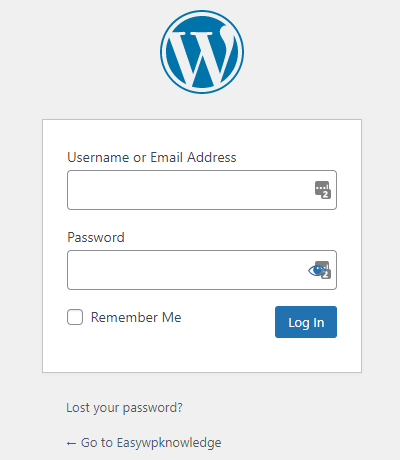
The first step is to log in to your Website Admin dashboard by typing your domain name and wp-login as shown below.
www.yourdomainname.com/wp-admin
Replace “yourdomainname” with your domain and hit enter.
for example, we for our site type the following address to go to the admin dashboard.
www.easywpknowledge.com/wp-admin
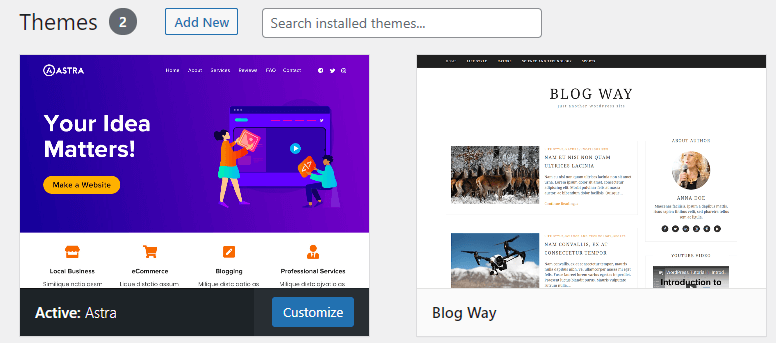
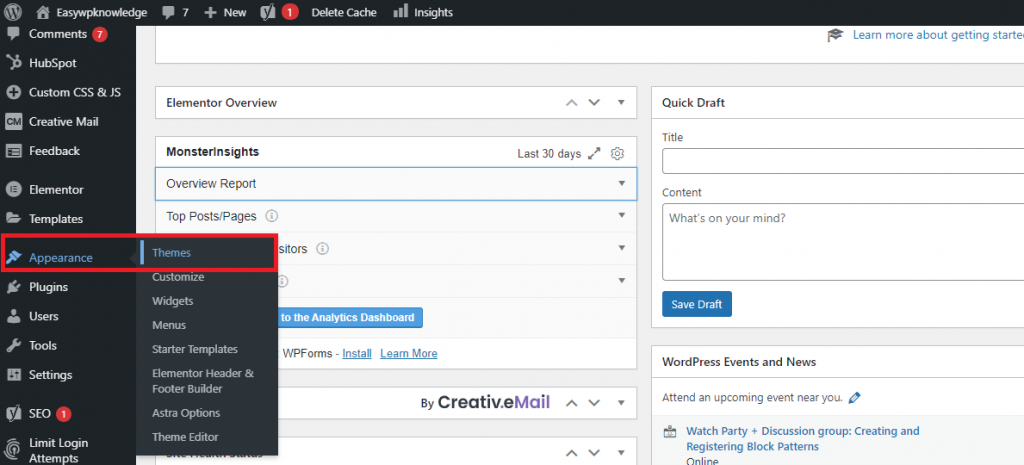
2. Go to Appearance Menu
After Logging in find Appearance in the left sidebar, hover over it, and Click Themes in the sub-menu.
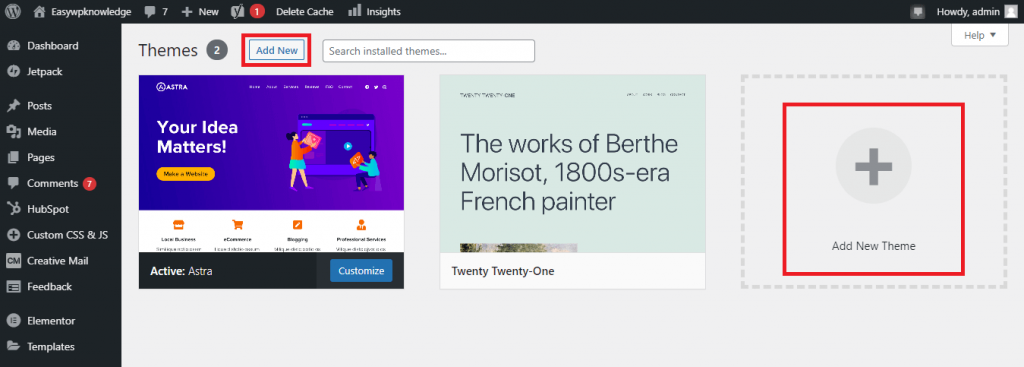
3. Install new theme
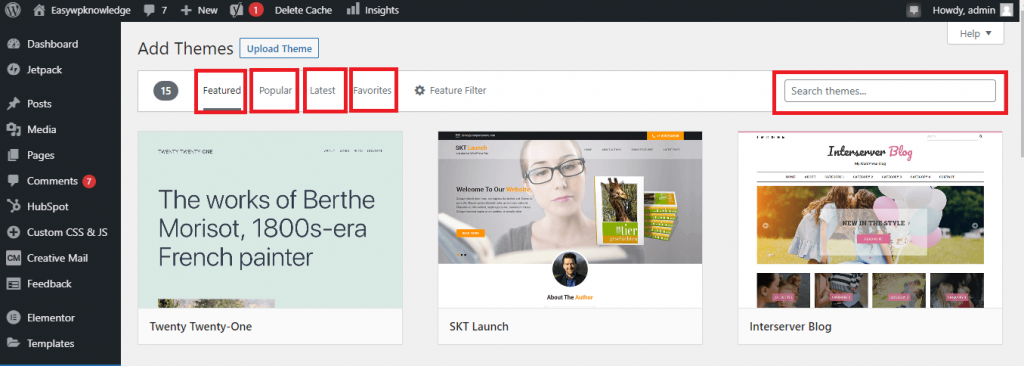
If you’re looking for a free theme then the best way is to install it from the WordPress theme directory provided by WordPress.org, you can search for any theme by using the built-in theme search functionality from your admin dashboard.
To go to the theme search page click on the “Add New” button.
4. New Theme Search
Here you see the theme search window. Here you search the 80000+ free WordPress themes of all categories. Start typing and it shows you your desired theme. You can also use the featured, popular, latest, or favorite tab to customize your search for better results.
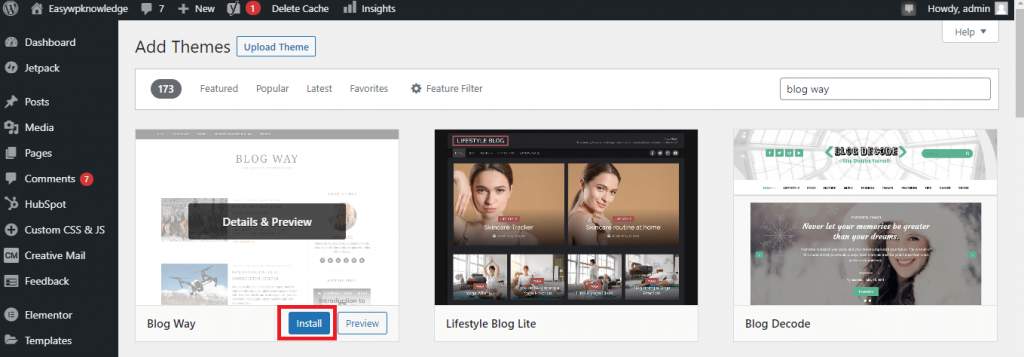
Step 1:
Step 2:
After finding your desired theme click on the install button. After installing the install button will be replaced with Activate. Click on the “Activate” button and the selected theme will be activated.
5. How To Install a WordPress Theme by uploading zip file
Besides theme searching for the default WordPress theme directory, you can buy from any external theme selling website and upload it directly to your website.
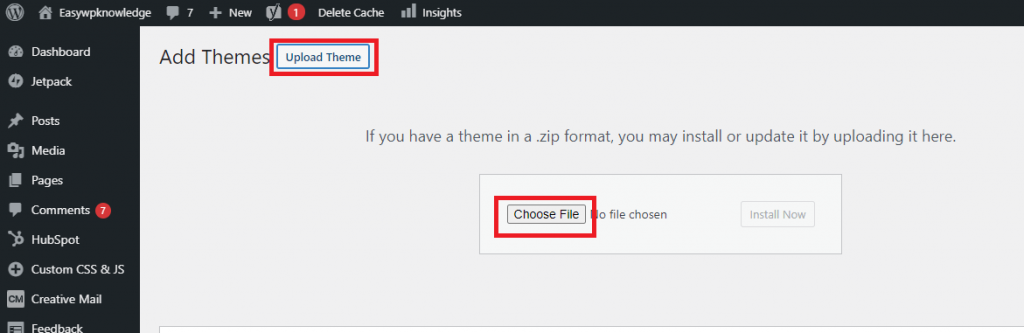
In your theme searching window, you will find an “Upload Theme” button at the top left corner, click on it and it will expand, and here it will ask you to upload your theme in a zip file.
Step 2:
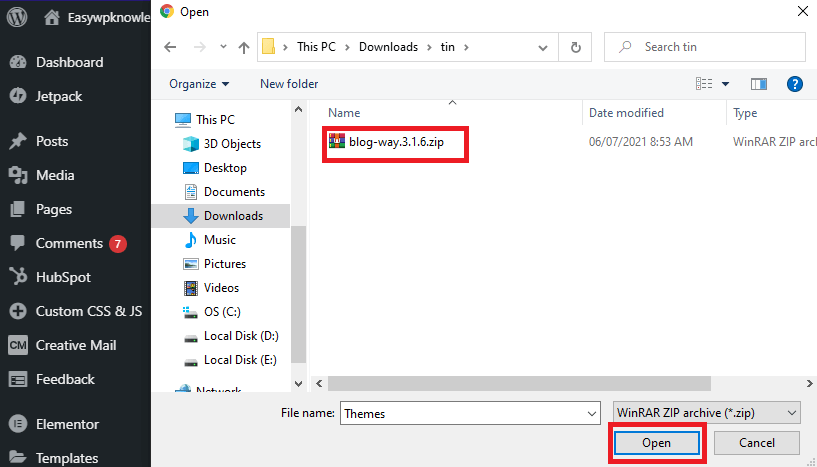
From the above window click on choose file, file explorer will be opened, here navigate to the folder where you have saved your theme and select the zip file, and click on the open button.
Step 3:
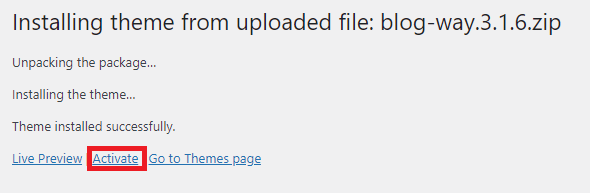
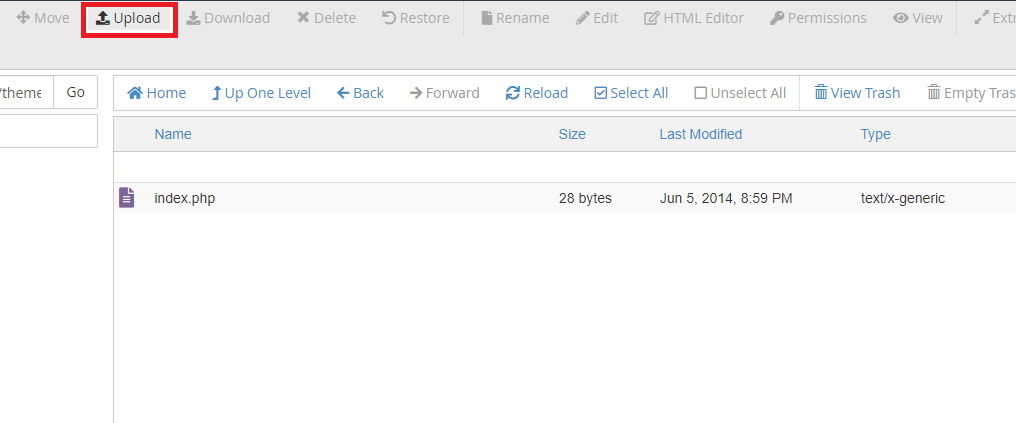
After selecting the theme zip file click on the “Install Now” button. It will start uploading the content of the theme to your server. After uploading files, the themes files will be extracted and copied to your themes folder. It will show you the message, as displayed below, that your theme has been uploaded successfully. Click on Activate button to Activate the newly uploaded theme.
The newly uploaded theme will be activated, go to the homepage and see how’s new theme is looking. enjoy!
6. How To Install a WordPress Theme using cPanel
there is another to install a new theme, for this, you should have ready your zip file. After you have your theme zip file, start to proceed,
Step 1:
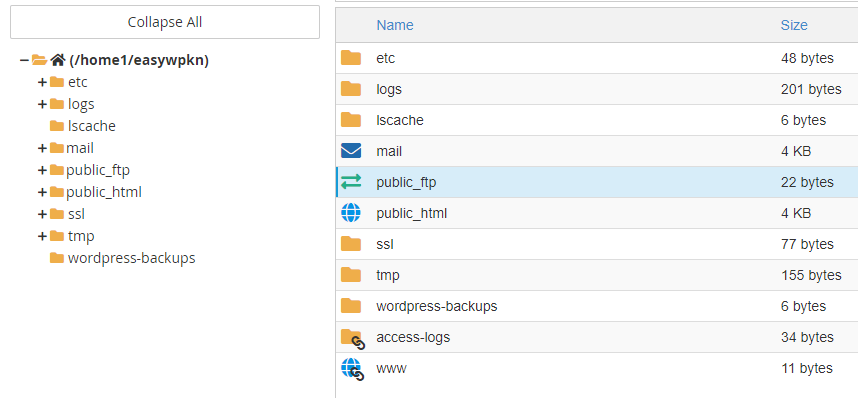
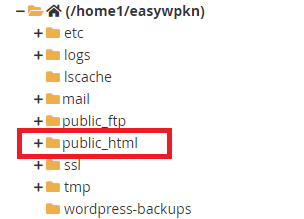
Go to your Cpanel by typing “yourdomainname.com/cpanel”. Now navigate to the File tab and click on “file manager”. The file manager will be opened in a new tab.
Step 2:
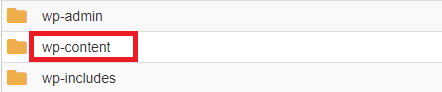
In the file manager window navigate to your site’s “public_html” folder and click on the “wp-content” folder.
Step 3:
Now, in the “wp-content” folder navigate to the themes folder, here all your previous themes are stored, click on the upload button and you will be redirected to the uploading window.
Here you can select your themes zip file using the select button or you can directly drag-n-drop your themes zip file.
Step 4:
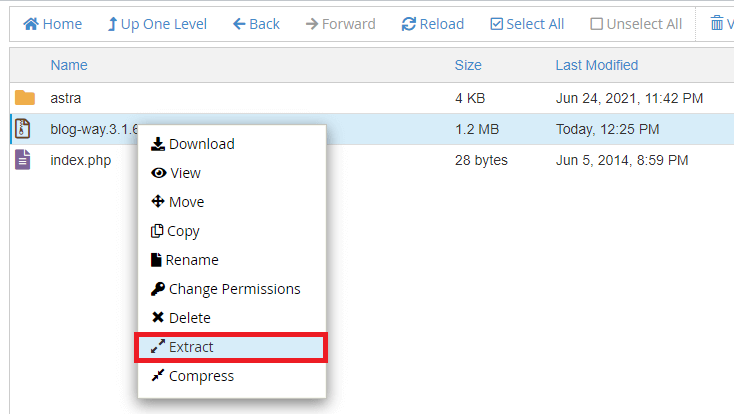
After uploading 100% complete, you can close this window and return back to your file manager and in the theme folder you will see the newly uploaded zip file, if you did not find the file just reload that page, right-click on that file and choose “Extract” option and choose the same directory for extraction and click on extract button.
The Theme folder will be extracted and delete the zip file to save your valuable space.
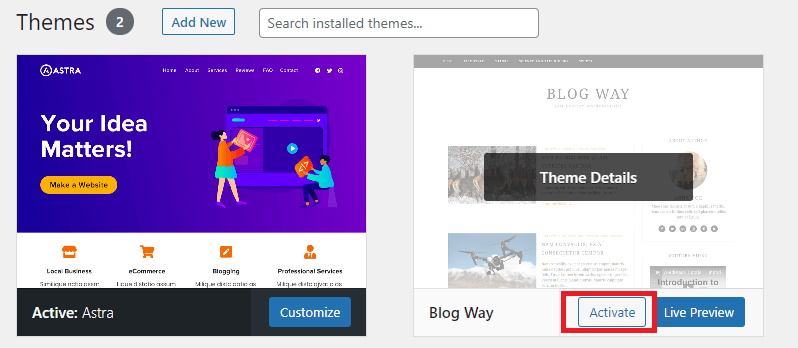
Step 5:
Now close the file manager and cPanel and return to your WordPress Admin Dashboard and navigate to the appearance>>themes menu. Here you will see your previous active theme and your new uploaded theme. Click on the activate button.
7. Bonus:
Long story short, you can choose any of the above methods or just drop us a message at admin@easywpknowledge.com and our expert WordPress will upload your new theme for Free.
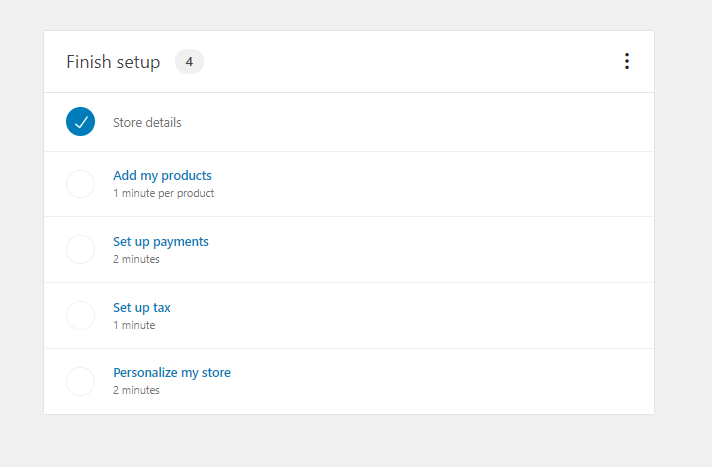
In this blog, we will show you the complete process of how to install the WooCommerce plugin, creating a store with the WooCommerce plugin, and configure your settings, so you can begin adding products.
WooCommerce is now the most popular plugin on WordPress for creating a store because of its great flexibility and variety of supported plugins available to customize your store.
Another great reason for choosing the WooCommerce plugin is that it’s easy to install and manage, even a non-technical person can manage a store on its own. It’s very easy to add or edit a product in WooCommerce and manage orders.
here we will show you the step-by-step guide on how to install and configure WooCommerce. So let’s get started.
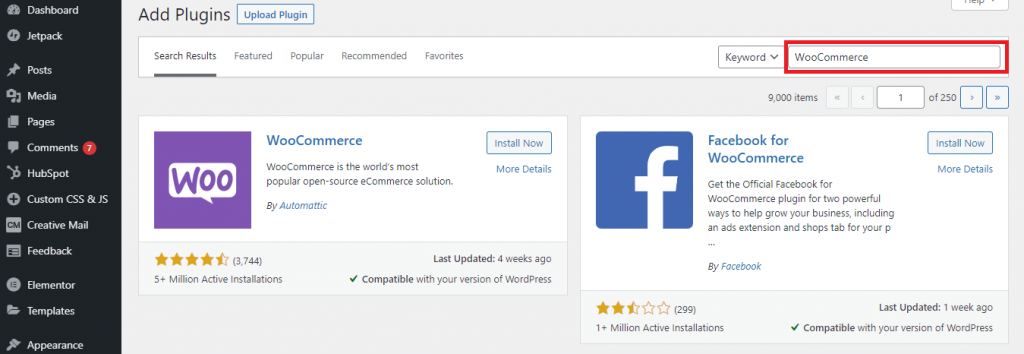
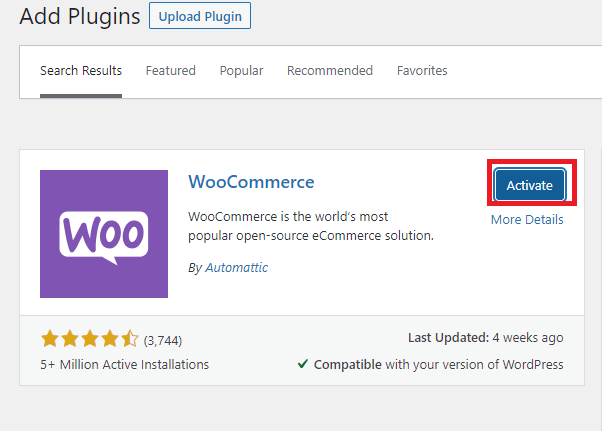
For Installing WooCommerce go to your WordPress dashboard and in the plugin, menu Click on Add New. This will take you to the plugin search window. In the search bar enter “WooCommerce” and hit enter. From the search results Choose WooCommerce and click on Install Now button.
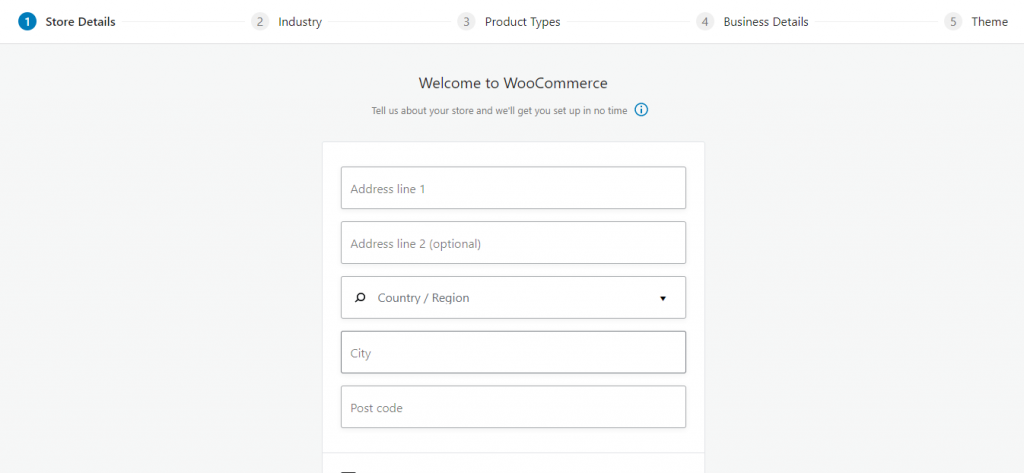
2. Setting up WooCommerce
Once the installation is finished the next step is to set up the WooCommerce. The easy startup wizard will help you in installation. In the first step enter the following details of your store
Store Address
Country
city
Post code
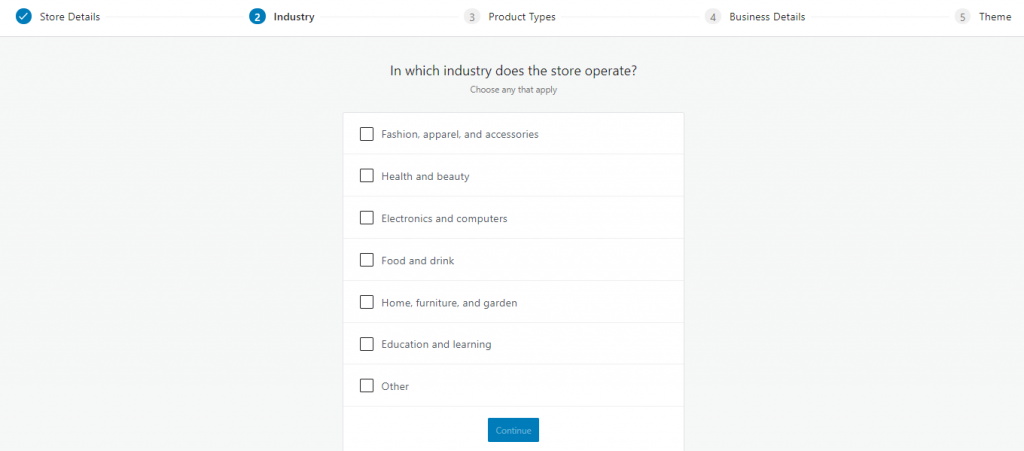
3. Enter store details
In the next step enter the basic details of your store. Select the store industry, either its fashion, medical or an Electronic, etc.
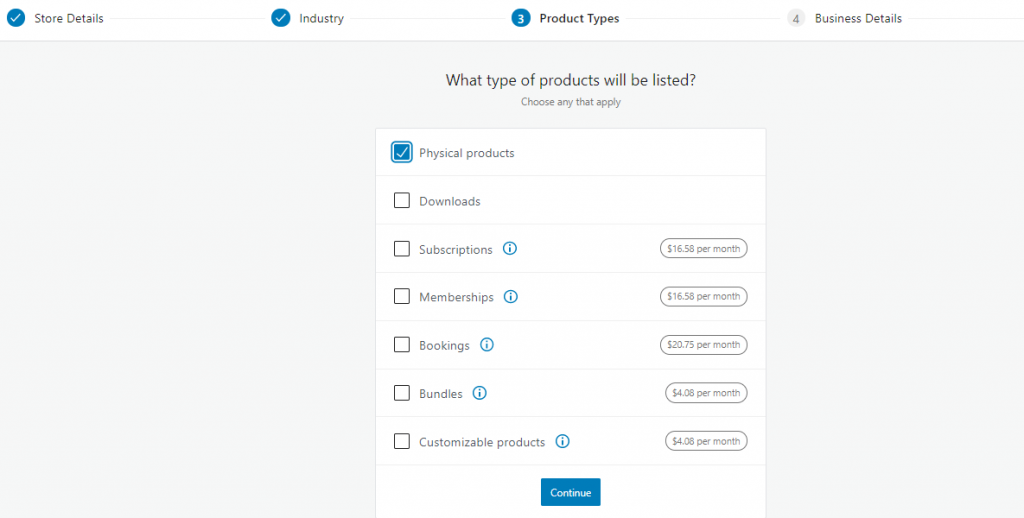
4. Select product types
In this step select the product types. You can select from these options.
Phusical Products
Downloads
Subscriptions
Memberships
Bookings
Customizeable products
install WooCommerce
The first two are included in the free version of WooCommerce, for the rest you have to buy the Premium version of the WooCommerce plugin
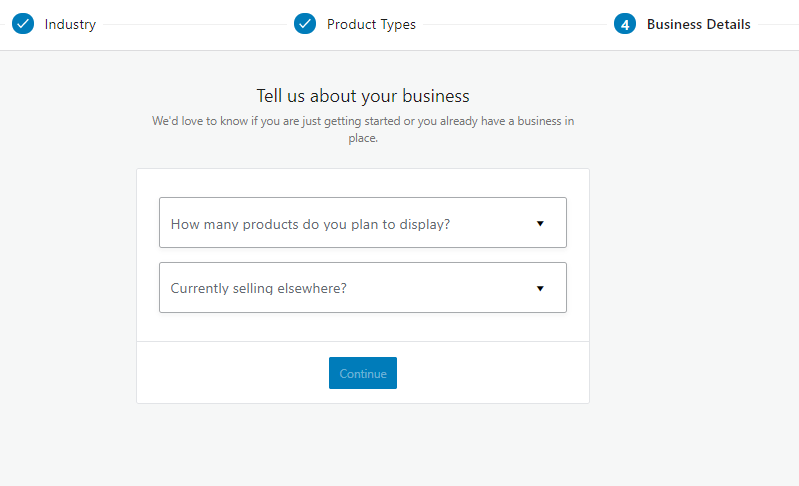
5. Business details
n this second last step you have to enter the information about your store. This information includes the details like how many products your store will have and currently you are selling anywhere?
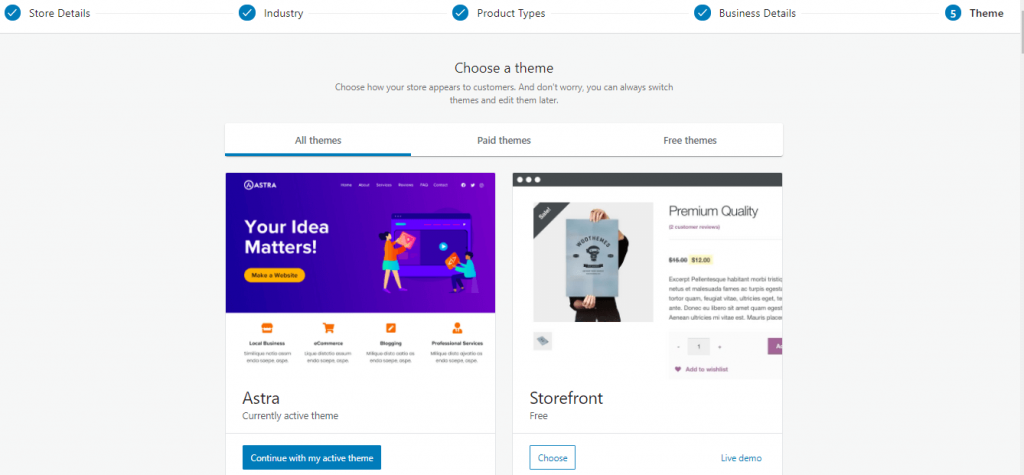
6. Choosing the theme
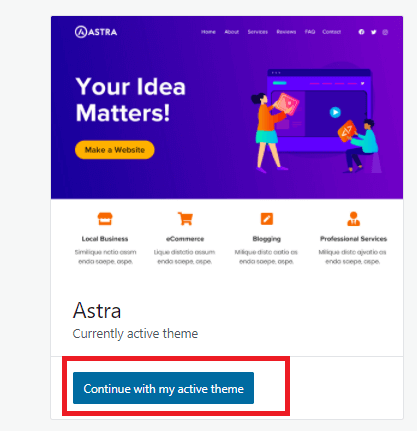
In this last step, you have to choose the WordPress theme that should support the WooCommerce plugin. You can search Google for “WooCommerce supported WordPress themes“. You will find many paid and unpaid themes that will support WooCommerce. Here WooCommercegives you the option to continue with your default theme, if your current theme support then you can select ‘Continue with my active theme‘ or you can select Storefront which is a famous WooCommerce theme. As our active theme, Astra supports WooCommerce so I continue with the first option.
This website’s active theme, Astra supports WooCommerce so continue with the first option.
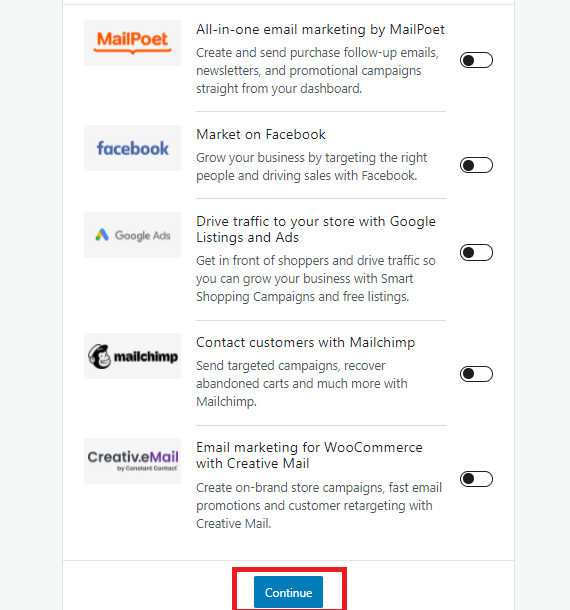
7. WooCommerce recommended plugins
Here WooCommerce will show you the list of some important plugins that will help you in your store marketing. These are the recommended ones, you can select them or skip them for now and install them later.
8. Finish install WooCommerce & Customize your store
After performing all the above steps, now it’s time to add products and set up your store details. First of all, you need to set up the payments and tax information for your store. We recommended adding multiple payments options for ease of your customers.
WordPress uses mail() function in PHP to send emails. Many hosting providers does not configure have this function properly, or to avoid abuse they have disabled it entirely. In either case, this causes your WordPress emails function to not function as expected .
Third party email service is the alternative solution is to send out your emails from wordpress. You can use services like Mailgun, Google Apps for work, or Sendgrid or sendinblue and many more…
You may have free services for limited number of emails, which is perfect for small blog, website or store. If you want high services you will have to pay for your account, and the cost will depend on how many emails you send. in this tutorial we show you how to fix WordPress not sending email issue completely.
What if told you that there is another option, and likely you are already paying for it? seems good!
2. Using Email Accounts given by Your Hosting provider
Most WordPress hosting providers offer email services free for each domain you host on their hosting servers. This means you can create email accounts with your own domains name like admin@yourblogaddress.com
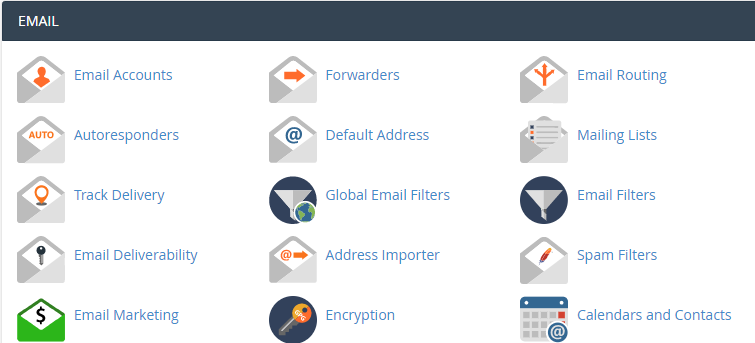
First of all you will need to create an email account. You can do this easily in your cPanel by following steps. Your hosting service provider visual may differ from following account management system, but the basic is the same on most hosting services.
Log into your site hosting cPanel account, and click on Email Accounts under the mail section.
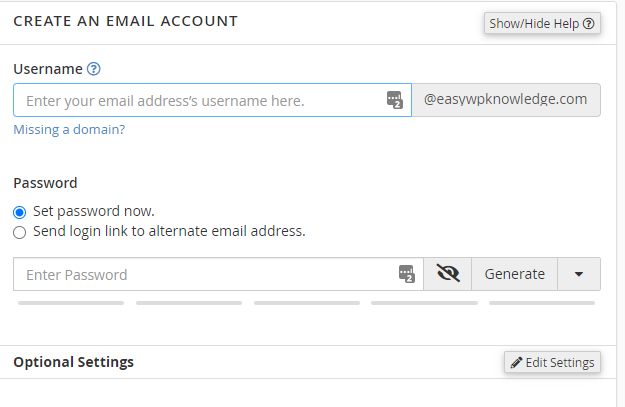
This will show you a form where you need to fill out required information to create your email account(s)/.
Since this will be your official email for WordPress site, we advise that you create an email account like admin@yourblogaddress.com.
Make sure to replace yourblogaddress with your own domain name.
After successfully creating your email account, you are now ready to use it in WordPress. But before continuing you do that, you will need the blow information from your hosting service provider.
SMTP Hosting address
SMTP Port number for secure login.
You can check the support section on your host’s website, cPanel managing, for this information. If you are unable just comment blow so we help you find it or you should contact the hosting support to request this information.
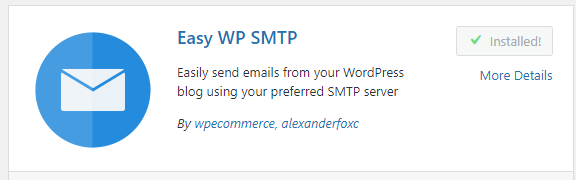
Install the Easy WP SMTP Plugin to your WordPress
You will now need to install and activate the Easy WP SMTP plugin. For more details, see our following step by step guide on how to install WordPress plugin.
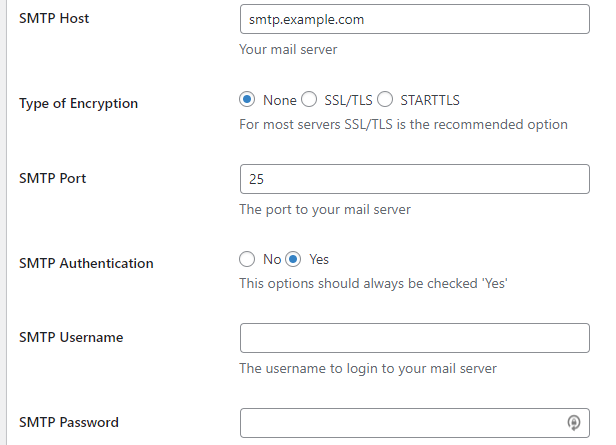
Upon activation, you need to visit Settings » Easy WP SMTP to configure the plugin settings.
Here you should provide the information that you get from your cPanel email account manager as provided above in picture.
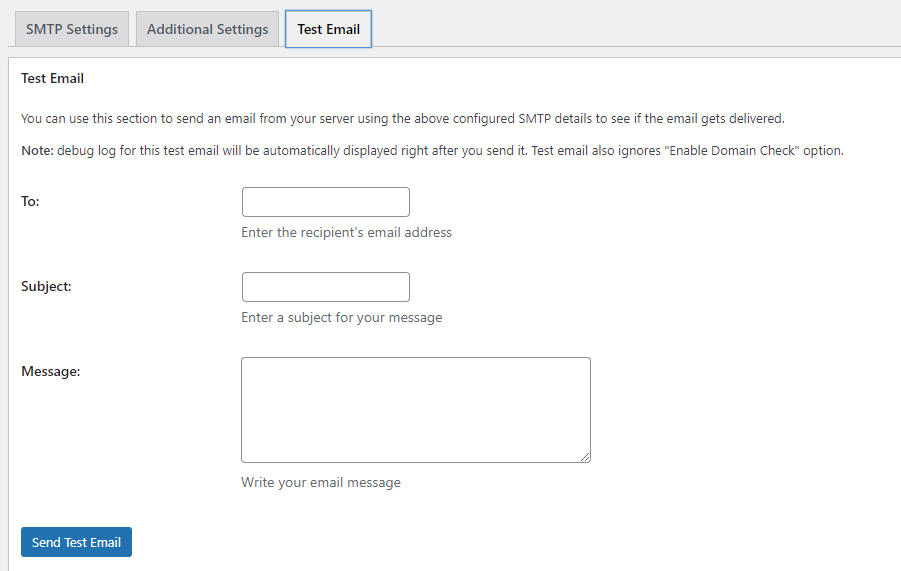
Testing Your Easy WP SMTP
Now that you have set up Easy WP SMTP to send emails, let’s test if our plugin and check if its working fine. On the plugin’s settings page, click on the ‘Test Email ’ tab. As seen blow
You need to provide your active email address where you would like to receive test email. This could be any Gmail oy Yahoo or any other valid email address that you can access right now. After that click on the “Send Test Email” button to continue process.
Easy WP SMTP will now send an email message using the new SMTP settings you entered. You will see a success message when email is sent successfully.